
Desserts
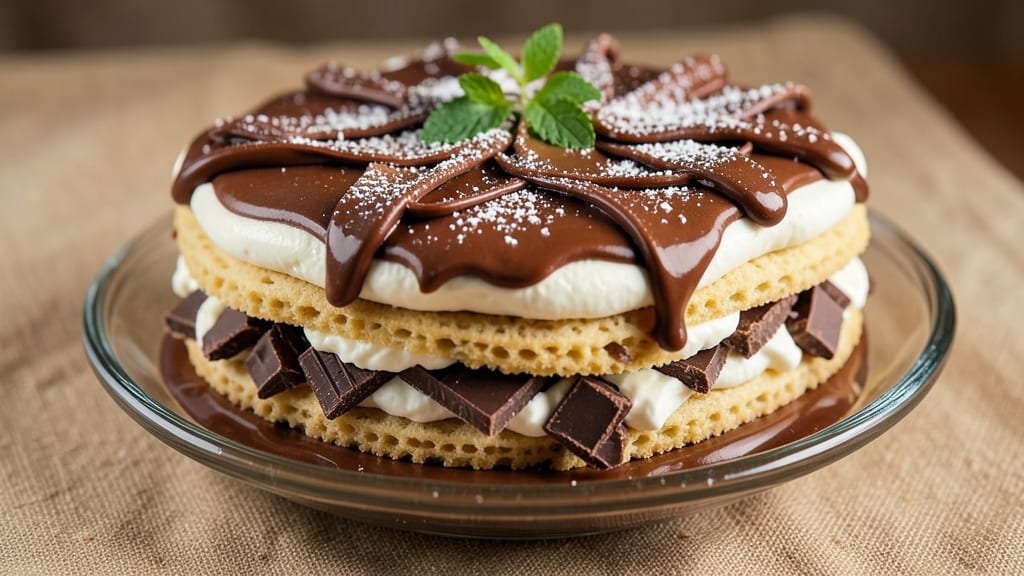
This Arabic lazy cake recipe delivers rich, fudgy chocolate layers without a single oven turn-on—just 10 minutes of hands-on time. 💛 The secret lies in its no-bake magic: melted chocolate, crushed biscuits, and a touch of cream cheese come together in a velvety, melt-in-your-mouth dessert that tastes like a Middle Eastern bakery treat.
Perfect for hot days or when you crave something decadent without the effort. What makes this cake truly special is its foolproof simplicity. No precise measurements, no baking skills required—just layer, chill, and serve.
The combination of chocolate and crushed cookies creates a texture that's both crumbly and creamy, while a dusting of powdered sugar adds that final touch of elegance. It’s the kind of dessert that feels luxurious but comes together in minutes.
The result is a restaurant-quality chocolate cake that’s light enough to enjoy as a midday treat but rich enough to satisfy a sweet tooth any time of day.
The layers stay perfectly set in the fridge, making it ideal for parties or when you need a showstopping dessert that doesn’t require hours of prep. Serve chilled with a dollop of whipped cream or a scoop of vanilla ice cream for the full experience.
Here’s how to make it—no oven, no stress, just pure chocolate bliss.
Ingredients for arabic lazy cake
No oven, no stress—just these 11 ingredients for a showstopping chocolate dessert.
| Ingredient | Amount | Notes |
|---|---|---|
| Semi-Sweet Chocolate Bars 🍫 | 16 oz | High-quality, chopped into chunks |
| Vanilla Wafer Cookies 🍪 | 16 whole | Crushed into fine crumbs |
| Cream Cheese (8 oz block) 🧀 | 8 oz | Room temperature, full-fat preferred |
| Heavy Whipping Cream 🥛 | 1 cup | Cold, for best whipping |
| Powdered Sugar 🍚 | 1 cup | For dusting layers |
| Unsalted Butter 🧈 | ½ cup | Melted, for binding |
| Vanilla Extract 🍯 | 1 tsp | Pure, for flavor |
| Salt 🧂 | ¼ tsp | Fine grain, for balance |
| Powdered Sugar (extra) 🍚 | 2 tbsp | For final dusting |
| Dark Chocolate Chips (optional) 🍫 | ½ cup | For garnish |
| Mint Leaves (optional) 🌿 | 4 whole | For garnish |
The chocolate makes or breaks this cake. Ghirardelli or Lindt bars melt beautifully, but any good-quality semi-sweet will work. Skip the chips—they melt unevenly. For the cookies, Nabisco vanilla wafers are the classic choice, but any buttery, crumbly cookie (like graham crackers) does the trick. The cream cheese? Philadelphia brand is reliable, but any full-fat block works. Pro tip: crush the cookies in a plastic bag with a rolling pin—no food processor needed. The butter matters too—use unsalted so you control the saltiness.
No vanilla wafers? Crushed vanilla cookies or shortbread work in a pinch. Running low on cream cheese? Substitute with equal parts whipped cream and powdered sugar, though texture will differ. The chocolate can be swapped for white or dark—just adjust sweetness to taste. For extra richness, add 1 tbsp cocoa powder to the melted chocolate. The powdered sugar dusting is non-negotiable—it’s what gives that bakery-fresh look. And if you’re feeling fancy, add a splash of orange liqueur to the melted chocolate for a boozy twist.
This cake keeps perfectly for 5 days in the fridge, with layers staying crisp. For parties, assemble it 24 hours ahead—flavors meld beautifully. To serve, dust each layer generously with powdered sugar and garnish with chocolate chips or mint. The whipped cream layer? Whip it just before assembling—it deflates fast. Store leftovers covered, but honestly, it disappears quicker than that. Freezes for 1 month if wrapped tightly in parchment and foil.
Why You'll Love This Recipe
- No-Bake Magic: I swear by this recipe when I need dessert now—no oven, no waiting, just layering crushed cookies, melted chocolate, and that creamy cheese filling. The only tools I use? A knife and a bowl. That’s it.
- Rich Contrast Bites: Between us, the chocolate bars and vanilla wafers create this perfect push-pull of flavors—sweet, buttery, and just a hint of bitterness from the chocolate. Honestly, I’ve had people ask if I baked it, but it’s all about that no-fuss assembly.
- Party-Ready in Minutes: This is my secret weapon for last-minute gatherings. Serve it chilled, and it’s elegant enough for a dinner party, but I’ve also packed it in a lunchbox for my kid’s school events. (Yes, even on a Tuesday night.)
- Leftovers? More Like Leftovers: The best part? It keeps perfectly for days in the fridge, so I can make one big batch and not stress about it disappearing. My freezer stash is always full of these—because why bake when you can layer?
Step-by-step instructions for Arabic lazy cake
This no-bake dessert comes together faster than you can say "lazy" - no oven required!
👨🍳 Step 1: Crush the Vanilla Wafer Cookies
Place all 16 whole vanilla wafer cookies in a resealable plastic bag. Using a rolling pin or heavy pan, crush them into fine crumbs - you want them to resemble sand rather than cookie pieces. I like to work in batches if my bag gets too crowded, as the cookies tend to stick together when overfilled.
Spread the crushed cookies evenly across the bottom of an 8-inch round springform pan. Press down gently but firmly with your fingers to create a compact base. This layer is your foundation - if it's too loose, your cake will crumble when you cut it. The cookies should form a continuous layer with no gaps.
🥘 Step 2: Melt the Chocolate and Butter
In a microwave-safe bowl, combine the 16 oz semi-sweet chocolate bars (chopped into chunks) with the 0.5 cup unsalted butter. Microwave in 30-second intervals, stirring between each, until completely melted and smooth. You should end up with a glossy, liquid chocolate mixture that coats the back of a spoon.
Let this chocolate mixture cool slightly for 2-3 minutes while you prepare the next components. The chocolate needs to be warm but not hot when you pour it - if it's too hot, it will melt the cream cheese mixture we'll add next. This cooling step is crucial for maintaining the proper texture of your cake layers.
🍳 Step 3: Whip the Cream Cheese Mixture
In a separate large bowl, beat the 8 oz cream cheese (at room temperature) with the 1 cup powdered sugar, 1 tsp vanilla extract, and 0.25 tsp salt using an electric mixer on medium speed until smooth and creamy. This should take about 2-3 minutes. The mixture should be thick but still pourable.
Gradually add the 1 cup cold heavy whipping cream while mixing on low speed. Increase to high speed and whip for another 2-3 minutes until the mixture forms stiff peaks. You'll know it's ready when you lift the beaters and the cream holds its shape briefly before collapsing. This whipped cream is what will bind everything together beautifully.
🥘 Step 4: Assemble the Lazy Cake Layers
Pour half of the melted chocolate mixture over the crushed cookie base in your pan. Use a spatula to spread it evenly, letting it seep into the cookie crumbs. Then spread half of the whipped cream mixture on top of the chocolate layer. Repeat with the remaining chocolate and cream layers, ending with the chocolate.
Here's the thing - don't worry if it looks messy. The magic happens when these layers chill and set. Gently tap the pan on the counter a few times to help the layers settle. Cover the pan with plastic wrap and refrigerate for at least 2 hours (or up to 4 hours) for the cake to firm up completely.
🍽️ Step 5: Dust and Garnish Before Serving
Once chilled, remove the cake from the refrigerator and dust the top generously with the 2 tbsp extra powdered sugar using a fine-mesh sieve. This creates that beautiful, snowy finish that makes the cake look even more tempting. For extra flair, press the 0.5 cup dark chocolate chips (if using) into the sides or top.
Garnish with the 4 whole mint leaves (if using) by placing them decoratively around the edges. Serve immediately or store covered in the refrigerator for up to 2 days. The contrast of the cool mint with the warm chocolate is what makes this dessert truly special - it's like a little flavor party in every bite!
Pro Tips For Making Arabic Lazy Cake
- CHILL THE CREAM CHEESE: I learned this the hard way—room-temperature cream cheese is a nightmare for this recipe. Pop that 8 oz block in the fridge for 30 minutes before mixing, or even better, let it sit in the freezer for 10 minutes. Cold cream cheese whips up fluffier and doesn’t turn greasy when folded into the cookies.
- CRUSH COOKIES UNIFORMLY: Skip the food processor if you want a clean finish. Use a rolling pin or heavy pan to crush vanilla wafers into fine crumbs—no big chunks. If you’re lazy and just pulse them in a bag, sift the mixture afterward to catch any stray cookie bits. Trust me, your layers will look (and taste) better.
- LAYER FAST, PRESS FIRM: Don’t rush the first layer, but don’t dawdle either. Spread the cookie-chocolate mix evenly, then press the next layer down hard—like you’re trying to make it stick. If you’re gentle, the cake will fall apart when you cut it. A glass or flat-bottomed cup works great for pressing.
- WHIP CREAM TO STIFF PEAKS: This isn’t the time to skimp. Whip the heavy cream until it holds stiff peaks—when you lift the whisk, the cream should stand in a sharp point. Soft peaks? Your cake will be soggy. And for the love of dessert, don’t overmix the cream cheese later; just fold it in gently until just combined.
Essential equipment for great arabic lazy cake
No-Bake Essentials
This lazy cake requires only basic kitchen tools—no fancy gadgets needed! Start with an 8-inch springform pan (or round cake pan) to hold the layers securely. I recommend Wilton brand for its sturdy sides that prevent leaks during chilling.
A plastic resealable bag and rolling pin are perfect for crushing cookies without a food processor. 🥛
Mixing Must-Haves
For the cream cheese mixture, a hand mixer or stand mixer works best—avoid whisking by hand to prevent overworking. I use my KitchenAid Artisan Series for consistent results. A fine-mesh sieve (like OXO Good Grips) is essential for dusting powdered sugar evenly.
For melting chocolate, a microwave-safe bowl (preferably Pyrex) ensures even heating without scorching.
Chilling Tools
Refrigeration is key—your cake needs a deep, stable fridge (below 40°F) to set properly. Use plastic wrap (not foil) to cover the pan tightly and prevent drying.
For serving, a sharp knife (like a Dexter-Russell 8-inch) ensures clean slices. A small offset spatula helps spread chocolate layers smoothly without tearing.
Optional Upgrades
Want restaurant-quality garnishes? A microplane (for zest) or piping bag (for chocolate drizzle) elevates presentation. For chocolate lovers, a double boiler (or heatproof bowl over simmering water) melts chocolate more gently than microwaving.
Swap vanilla wafers for gluten-free cookies (like Schär) if needed—just crush them extra fine for texture.
Nutrition facts
Frequently asked questions
Can I make this cake without vanilla wafers?
Swap vanilla wafers for graham crackers, shortbread cookies, or even crushed pound cake. Just crush them extra fine to mimic the texture. For a nutty twist, try pecan sandies or amaretti cookies. The key is using a buttery, crumbly cookie that won't dissolve into the chocolate layers.
Why does my cake crumble when slicing?
This usually happens if the cookie base wasn't pressed firmly enough or the layers weren't chilled long enough. Press the crushed cookies very tightly into the pan to create a solid foundation. Also, ensure the cake chills for the full 2-4 hours—this lets the chocolate set properly. If it still crumbles, try adding 1 extra tablespoon of melted butter to the chocolate layer for better binding.
Can I make this cake ahead of time?
Yes! This cake actually tastes better after 24 hours in the fridge as the flavors meld. Assemble it up to 3 days ahead and store it covered. For parties, wrap individual slices in parchment and plastic wrap—they'll stay fresh for 2 days. Freeze it for up to 1 month by wrapping tightly in foil and parchment, then thaw overnight in the fridge before serving.
What’s the secret to perfect chocolate layers?
Use high-quality chocolate bars (like Ghirardelli or Lindt) and melt them gently—never overheat! The chocolate should be warm but not hot when poured to avoid melting the cream cheese layer. Let it cool for 2-3 minutes after melting. Also, spread each layer evenly and thinly—this creates clean slices and prevents a soggy texture. A small offset spatula works best for smooth spreading.
Is this cake gluten-free or dairy-free?
Traditional versions contain gluten (from cookies) and dairy (cream cheese, butter, chocolate). For gluten-free, use certified GF cookies like Schär vanilla wafers. For dairy-free, swap cream cheese for coconut cream cheese, butter for coconut oil, and regular chocolate for dairy-free bars. The texture will be slightly different, but still delicious! Always check labels—some chocolate brands contain milk.