Breakfast & Brunch
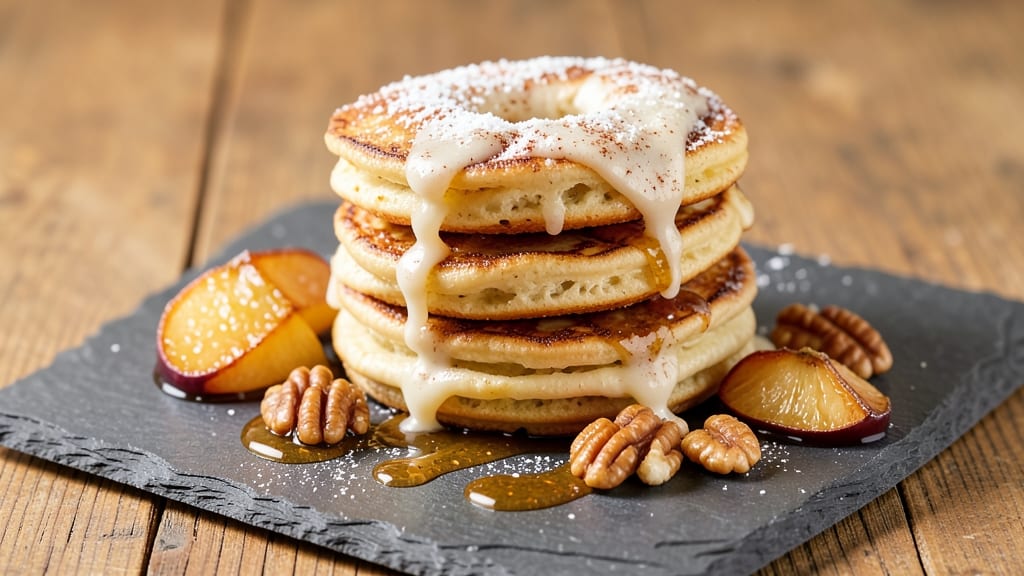
This apple pancake rings recipe transforms breakfast into a showstopper with golden, crispy edges and caramelized apple centers that taste like autumn in every bite.
The secret lies in using a thick batter that holds its shape when cut into rings, while the apples soften just enough to create that perfect tender-crisp contrast. I developed this recipe after years of experimenting with pancake shapes—this one’s foolproof and delivers restaurant-worthy presentation every time.
The process starts with a simple buttermilk batter infused with cinnamon and vanilla, then layered with thin apple slices before cooking.
Whether you fry them in butter or bake for a lighter version, the key is patience—waiting for that perfect golden-brown crust ensures they stay crispy on the outside while keeping the apple centers juicy inside. The result?
Pancake rings that look elegant enough for brunch but are easy enough for a weekend morning.
What makes these stand out is how they balance texture and flavor—crispy edges give way to tender pancake with pockets of caramelized apple in each bite. Serve them warm with maple syrup, whipped cream, or a drizzle of homemade caramel for an extra touch of indulgence.
This isn’t just breakfast; it’s a dessert-worthy centerpiece that’ll have everyone asking for seconds.
Perfect for weekend brunches, holiday gatherings, or even a special treat when you want to impress. The recipe scales easily, so you can make a single batch for two or double it for a crowd. Let’s get started—your kitchen (and taste buds) will thank you.
Ingredients for apple pancake rings
Golden rings of crispy perfection with caramelized apple centers—just 12 ingredients transform breakfast into a showstopper.
| Ingredient | Amount | Notes |
|---|---|---|
| All-Purpose Flour 🌾 | 2 cups | Sifted for fluffy texture |
| Granulated Sugar 🍚 | ½ cup | White or brown preferred |
| Baking Powder 🧂 | 2 tsp | Aluminum-free for best rise |
| Salt 🧂 | ½ tsp | Fine sea salt preferred |
| Ground Cinnamon 🌿 | 1 tsp | Warm, aromatic variety |
| Vanilla Extract 🥄 | 1 tsp | Pure vanilla preferred |
| Large Eggs 🥚 | 2 whole | Room temperature for best mixing |
| Buttermilk 🥛 | 1 ½ cups | Fresh for optimal tang |
| Unsalted Butter 🧈 | ½ cup | Cold, cubed for crispy rings |
| Apples 🍏 | 2 medium | Honeycrisp or Fuji, peeled |
| Vegetable Oil 🫒 | ¼ cup | For frying, high smoke point |
| Maple Syrup 🍁 | ¼ cup | Grade B for rich flavor |
The apples are non-negotiable—Honeycrisp or Fuji have that perfect balance of sweetness and firmness. Local orchards or Trader Joe's often have them in season, but any crisp variety works. Peel them first, then slice into 1/4-inch rounds—uniform thickness ensures even cooking. For extra caramelization, toss the slices in 1 tsp of lemon juice before assembling. The batter needs to be thick—about the consistency of heavy cream—so don't skimp on the flour. I always measure mine by weight (250g) for foolproof results, but cups work too if you're eyeballing it.
No buttermilk? Mix 1.5 tbsp lemon juice or vinegar with 1.5 cups milk and let sit 5 minutes. The cinnamon is key—Ceylon cinnamon has a sweeter profile, but regular works fine. Want more depth? Add 1/4 tsp nutmeg to the batter. The apples can be prepped ahead—store them in lemon water in the fridge for up to 24 hours before cooking. For a lighter version, swap half the butter for applesauce—the rings will be less crispy but still delicious. And if you're feeling fancy, dust them with powdered sugar right after frying.
These taste even better the next day—3 days max in the fridge, stored between layers of parchment paper to keep them crispy. Reheat in a 350°F oven for 5-10 minutes until golden. Freeze uncooked rings on a tray first, then transfer to a bag for up to 3 months. Pro tip: Double the batter and freeze half—perfect for lazy mornings. The syrup drizzle? Grade B maple has that rich, robust flavor, but any good-quality syrup works. Keep it in the fridge after opening—it crystallizes over time, but just warm it gently to restore smoothness.
Why You'll Love This Recipe
- No-Fuss Shape: I just mix the batter—flour, sugar, cinnamon, and a pinch of salt—then spoon it into a ring mold (or a glass) and bake. No rolling, no fussing with dough. The apples go in the center while it’s warm, and boom—done.
- Cinnamon-Kissed Magic: That ground cinnamon? It’s not just a sprinkle—it’s the star. Warm, sweet, and cozy, it turns ordinary pancakes into something that tastes like autumn in a bite. The apples caramelize just enough to make every ring feel special.
- Breakfast or Dessert: Honestly, I make these for both. Serve them with butter and syrup for a lazy weekend brunch, or dust them with powdered sugar and a drizzle of honey for an after-dinner treat. Kids love them either way.
- Budget-Friendly Leftovers: Flour, sugar, and cinnamon are cheap staples, and the batter makes enough rings to feed a crowd—or save for later. I’ll be real: I’ve reheated these in the toaster the next morning, and no one’s complained. (Yes, even on a Tuesday night.)
Step-by-step instructions for apple pancake rings
Here's how to create golden, crispy apple pancake rings with caramelized centers every time.
Prepare the Apple Rings and Pancake Batter
First, peel and core the 2 medium apples, then slice them into ½-inch thick rounds. Use a small cookie cutter or the rim of a glass to cut each slice into rings. Toss the apple rings with 1 tablespoon of the 0.5 cup unsalted butter and 1 tablespoon of the 0.5 cup granulated sugar, coating them evenly. Set aside.
In a large bowl, whisk together the 2 cups all-purpose flour, 0.5 cup granulated sugar, 2 teaspoons baking powder, 0.5 teaspoon salt, and 1 teaspoon ground cinnamon. In another bowl, beat the 2 whole large eggs, 1.5 cups buttermilk, 1 teaspoon vanilla extract, and the remaining 0.25 cup unsalted butter until smooth. Gently fold the dry ingredients into the wet mixture until just combined—don't overmix, or your pancakes will be tough.
Cook the Apple Rings Until Caramelized
Heat 0.25 cup vegetable oil in a large skillet over medium heat. Add the apple rings in a single layer and cook for 2-3 minutes per side, until golden brown and slightly caramelized. Remove the rings and set them aside on a paper towel-lined plate. Keep the oil in the skillet for the pancakes.
Here's the trick: don't crowd the pan. Cooking the apple rings in batches ensures they crisp up instead of steaming. If the oil starts smoking, reduce the heat slightly—you want gentle sizzling, not flames. The caramelization happens quickly, so watch them closely.
Fry the Pancake Rings to Perfect Crispiness
Increase the heat to medium-high and add ¼ cup of the pancake batter to the skillet. Immediately pour 0.25 cup maple syrup into the center of the batter. Quickly tilt the pan to spread the batter into a thin ring around the syrup. Cook for 1-2 minutes until the edges are golden brown and the batter sets slightly.
Flip the pancake ring carefully using a spatula. Cook for another 1-2 minutes until the underside is golden and crispy. Remove from the skillet and place on a wire rack. Repeat with the remaining batter, adding more oil as needed to maintain the same level. Real talk: the first one might look messy, but you'll get the hang of it.
Assemble and Serve Warm
Place a cooked apple ring in the center of each pancake ring. Drizzle with any remaining maple syrup from the skillet and serve immediately while everything is warm and crisp. The combination of the fluffy, crispy pancake ring and the caramelized apple creates the perfect balance of textures and flavors.
For the best experience, serve with a dollop of whipped cream or a scoop of vanilla ice cream. The contrast of the warm, crispy pancake rings with the cool cream is pure magic. And if anyone asks, these aren't just pancakes—they're a delicious breakfast masterpiece!
Pro Tips For Making Apple Pancake Rings
- COOL THE APPLE FIRST: Thinly sliced apples release juice like a broken faucet. Toss them in lemon water for 10 minutes before cooking—this keeps them from turning brown and making your batter soggy. (Yes, even if you’re impatient like me, give it that time.)
- USE COLD BUTTER: I learned this the hard way—melting the butter first makes pancakes dense. Cut cold butter into small cubes and fold them into the batter at the last second. They’ll create pockets of fluffiness when they hit the hot pan.
- SKIP THE OVERMIXING: The moment your batter looks like glue, stop stirring. Overmixing develops gluten and turns your rings into tough pancake doughnuts. Mix just until the flour disappears—about 10 seconds past that point is too late.
- PAT THE RINGS DRY: Wet apple slices = steam = soggy pancakes. After shaping the rings, press them gently with a paper towel to soak up excess moisture. The rings will crisp up faster and hold their shape better on the griddle. (Your future self will thank you.)
Essential equipment for great apple pancake rings
Non-Negotiable Skillet
You’ll need a 10-inch cast iron skillet—it’s the gold standard for even heat distribution and crispy edges. I swear by a Lodge Pre-Seasoned Cast Iron Skillet because it develops a natural nonstick surface over time.
If you don’t have cast iron, a well-seasoned stainless steel skillet (like All-Clad) works too, but avoid nonstick—it can’t handle the high heat needed for crispy rings. Preheat your skillet for 2-3 minutes on medium-high before adding oil to ensure the batter sizzles immediately. 🔥
Cookie Cutter Kit
A 3-inch round cookie cutter or a small glass (like a shot glass) is essential for cutting perfect apple rings. I keep a set of Wilton Silicone Cookie Cutters in my kitchen—they’re flexible, easy to clean, and last forever.
For the pancake batter, you’ll need a measuring cup and a spatula to spread the batter into rings. Pro tip: Dip your cutter in warm water between uses to prevent sticking with apple juices.
Wire Rack & Paper Towels
After frying, you’ll want a wire cooling rack to keep the pancake rings crispy instead of soggy. Place it directly on your counter or a baking sheet. Line a plate with paper towels to drain excess oil from the apple rings before assembling.
I also keep a small bowl nearby to catch any stray syrup drips—trust me, it’s a game-changer for cleanup. 🧻
Thermometer for Oil
A candy or deep-fry thermometer ensures your oil stays between 350-375°F—this range gives you crispy pancakes without burning. I use a Thermoworks Thermapen One because it’s fast and accurate, but even a cheap instant-read thermometer works.
If you don’t have one, test the oil by dropping a tiny bit of batter in—it should sizzle and turn golden in 30 seconds. Never let the oil smoke!
Butter Knife for Assembly
A sharp butter knife makes assembling the pancake rings effortless. Use it to gently lift the cooked apple ring and place it in the center of each pancake ring. For extra flair, dust the finished rings with powdered sugar using a fine-mesh sieve.
I also keep a small squeeze bottle handy for drizzling maple syrup neatly—it’s way less messy than a spoon. 🍁
Backup Plan Tools
No cookie cutter? No problem. A serrated knife and a ruler work in a pinch for cutting apple rings. For the pancake batter, a pastry bag with a large star tip can help create uniform rings if you’re feeling fancy.
And if your skillet is too small, a nonstick oven-safe skillet can double as a baking option for a lighter version. Just preheat your oven to 375°F and bake for 10-12 minutes per side.
Nutrition facts
Frequently asked questions
Can I make these apple pancake rings without a cookie cutter?
Use a small glass (like a shot glass) or even a serrated knife with a ruler to cut 3-inch rings from your apple slices. For the pancake batter, spread it into rings using a measuring cup or spatula—just keep the edges even for that perfect shape. The key is consistency in size so they cook uniformly.
How do I prevent the pancake rings from falling apart?
Thick batter is your best friend—it should be like heavy cream, not thin. Use 2 cups flour and don't substitute with cake flour (it's too fine). Also, cook them over medium-high heat and flip carefully when edges are set but centers still look slightly wet. Overmixing the batter makes them tough, so fold just until combined.
Can I use different types of apples for this recipe?
While Honeycrisp or Fuji are ideal for their balance of sweetness and firmness, you can try Granny Smith (tart but holds shape) or Gala (softer, sweeter). Avoid mushy varieties like Red Delicious—they'll fall apart when cooking. Toss your chosen apples in 1 tsp lemon juice before prepping to prevent browning and add brightness.
What's the best way to store leftover apple pancake rings?
Keep them crispy by storing between layers of parchment paper in an airtight container at room temp for 1 day. For longer storage, refrigerate for up to 3 days or freeze uncooked rings for 3 months. Reheat in a 350°F oven for 5-10 minutes until golden. Pro tip: Freeze cooked rings separately from uncooked batter to maintain texture.
Can I make these pancake rings ahead of time?
Yes! Prep the apple rings and batter the night before, then store separately in the fridge. Cook fresh when ready—this keeps the pancakes crispy. For a shortcut, assemble the rings (without cooking) and refrigerate for up to 4 hours before cooking. The apples will soften slightly but still caramelize beautifully when fried.